Our city sells off surplus equipment every year or three. I put bids in on a MF 12 garden tractor, 10hp generator with blown engine, 4 cylinder powered wood chipper, and a huge V8 Diesel powered 3 phase generator.
It would be nice to have the Wisconsin powered MF 12. The 3 phase generator would sllow me to use 3 phase equipment w/o a roto phase converter.
The follow two items are the only ones I really want.
This flat contains an Onam that just might serve as a replacement engine for the 682.
It also has a 10HP briggs powered colman generator with a hole in the block.
EDIT: My neighbor got this lot. He later gave me both the Onan and the generator.
I had the highest bid on the MF 12 so it came home with me too.
The gear driven MF 12 garden tractor.
Results: Top bid for the MF12 garden tractor with 42 inch deck. Hitched up the tractor snatcher/grabber and brought it home.
Where small engines rise from the grave
Follow me on my journey as I attempt to return
abandoned lawn tractors, engines and implements
to working condition.
Thursday, April 20, 2017
Monday, February 6, 2017
Another carb day.
Cleaned the carb on the Murray 14.5 yesterday.(Murray 14.5/12.5 Hybrid) Was some rust in the bowl and on the bottom of the jet tower. It ran fine with some 'heat' gas treatment in the tank. On plain gas it surges or hunts quit bad. A bit of choke fixes it but that just tells me the carb still has problems. Put some seafoam in it today but I don't think it helped.
Started on a carb from a craftsman lawn tractor with a 14.5HP OHV. This is much the same setup as the 14.5 above but uses the newer plastic intake. It was water damaged but I will try to get it working. Bowl gasket is shot. Going to order a new bowl too.
2877707-1255-E3
I was a bit more aggressive in cleaning this one. Used carb cleaner on the passages. Going to test it on the 14.5HP Murray because I have to pull that carb back off anyway.
Replaced the elbow and bowl gasket but the needle valve leaks.
Saturday, February 18, 2017
Murray 14.5/12.5 Hybrid is still surging. Hit it with carb cleaner again and tried running premium gas with heet and sea foam. Worked better but not acceptable.
So I installed the XA Nikki clone. It runs but for reasons I don't understand it does not respond much to the throttle. Tightened the governor spring a bit to get more high end. So it has medium to high but no idle. That may be good enough.
Still need to button up the air cleaner.
1991 K1500
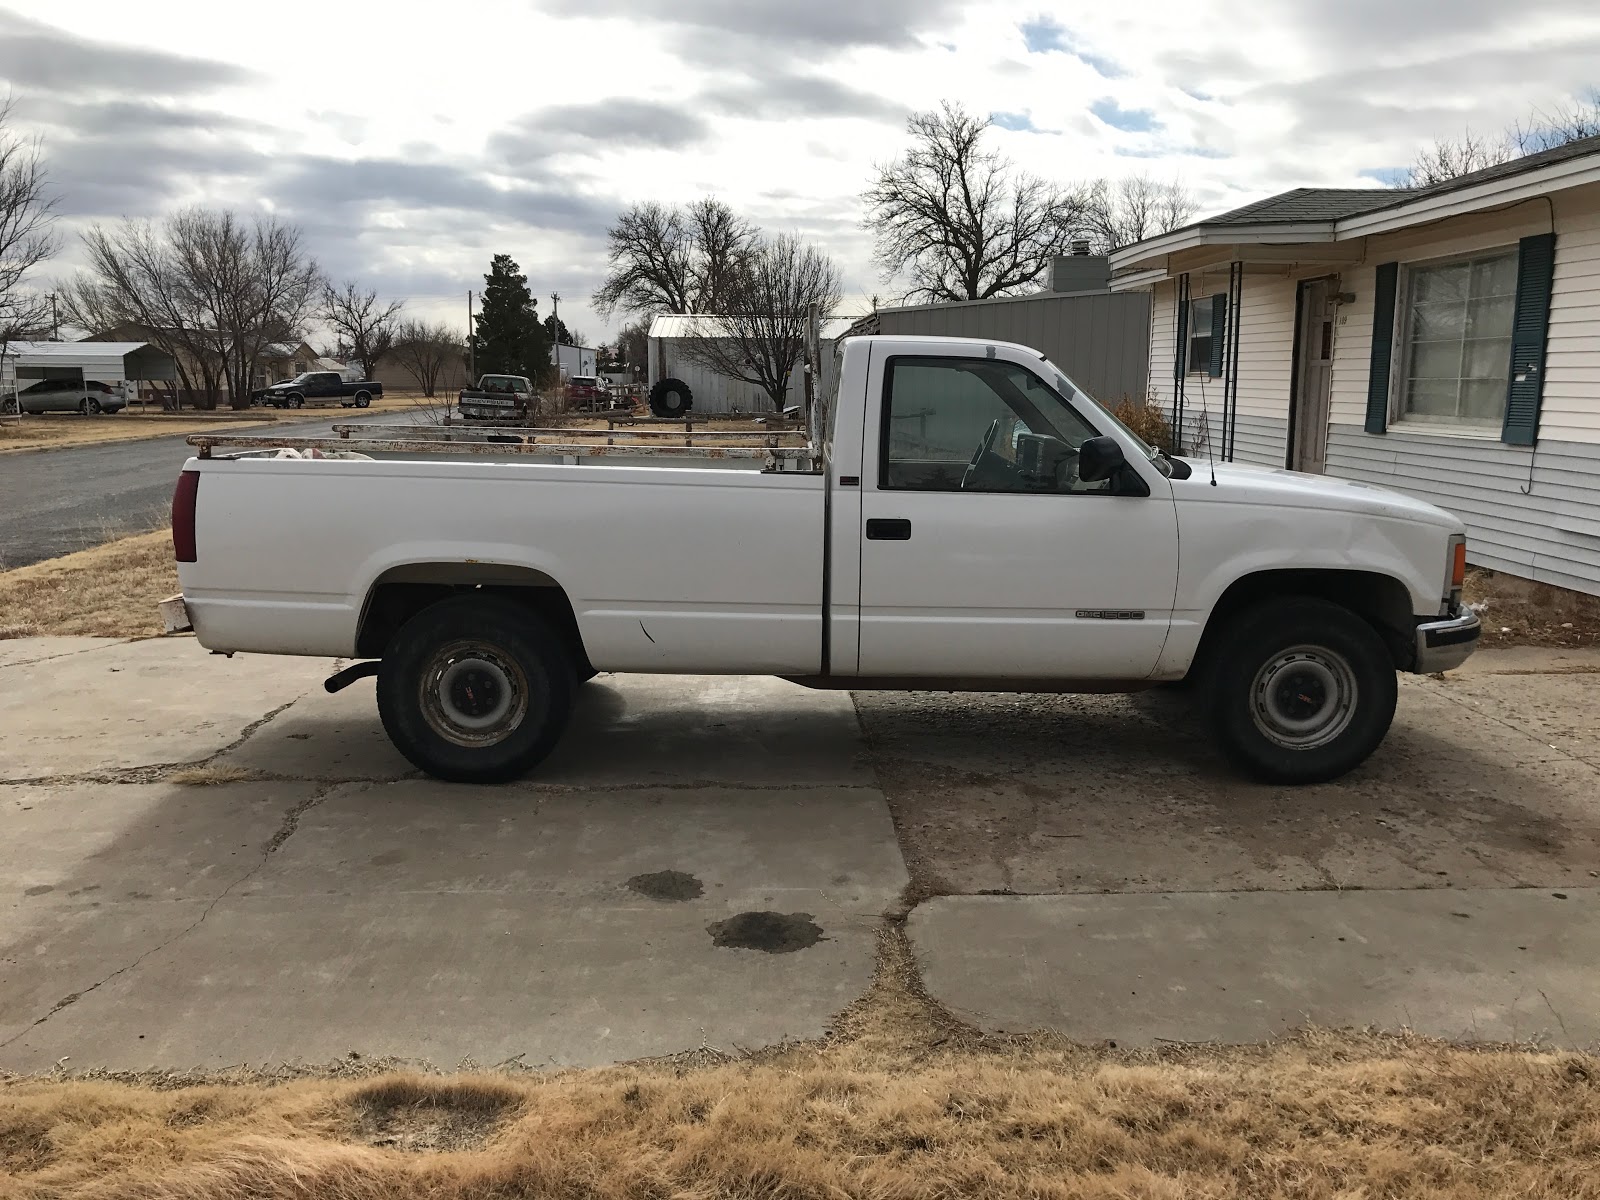
Something a bit different for ZombieEngines. A 4WD 1/3 ton, V6, 5 speed manual, GMC Pickup Truck! True to ZombieEngines standards it was dead, or nearly so when acquired. AKA inexpensive.
This virtually rust free truck was acquired from someone we know. The odometer stopped working 10 years ago at 46K. It was used as a farm/ranch truck.
Shortly after purchase the ignition module inside the distributor burned out. First I purchased the wrong one. The next one I purchased lasted about 20 miles. The screws holding it to the distributor base plate let loose. Maybe this was why the original one died. I ordered a better than original AC Delco module and replaced the sheet metal screws holding it down with machine screws and nylock nuts.
The front end is a bit messed up but it seems to be entirely cosmetic.
The brakes are very poor. You can stop with enough advanced warning. Not safe in traffic. When you hold your foot on the brake you can hear a hiss and the engine speeds up. Thinking it is the brake booster.
When you turn the ignition on or off a troll kicks the dash about 10 time. Very annoying. Something with the air blend door I think.

There is another dent above the drivers side rear wheel.
Has a bumper hitch and round trailer wiring connector.
The truck has a toggle switch for power and a starter button in the ash tray. Kind of interesting but the wife suggested we put it back to factory. I pulled the steering column apart to get the old ignition lock cylinder out. YouTube helped with that.
When I exposed the wiring I found this. I don't see where any wires have been cut but I also don't see how it goes together once I remove the added switch and button.

The blue and black female connectors go to the male connector on top the steering column. Dropped the column to get better access but it is still tight for my king sized mitts.
It is easy to insert the black connector but the blue one is problematic. I accomplished it by removing the 'starter switch' from the top of the steering column.
I managed to get the truck started using the modified old lock cylinder but was unsure if the bits past the lock were not damaged.
Wednesday, February 8, 2017
The parts in the above image are wrong , they are for a tilt wheel. Need to order this one.
Today I finished tearing down the steering column, The videos on youtube must all be for tilt wheels. Mine had screws from the bottom holding the upper housing to the lower. There was minor plastic damage where the last guy tried to pry it off, as did I. Removed the hi/low and ignition switches again.
The gear shown above is missing a tooth in my column. I am removing the wheel lock mechanism. It is pushed up by the key switch action and pushed back down by a spring. The spring is weak. Getting rid of it may also make the key a bit easier to run. Yes I am cleaning everything up.
Saturday, February 11, 2017
Today and yesterday I put the steering column back together. Used silicon grease on the moving plastic parts. There is a bit of a gap between the wheel and column but I can live with that.
Need to be sure that one installs the rod for the hi/low beams and the metal bit that connects the blinker lever to the blinker mechanism inside the column prior to installing the lock plate.
Used a AC Delco switch and the key comes out without the lever mechanism. So as mentioned above I did not the steering lock pin and the key release lever.
Ran it around a bit, dash cluster not installed, and had a friend verify that the booster is dead.
Saturday, February 18, 2017
The brake booster is in. Works well but will work better when I get around to bleeding the brakes. Pulled the idle air valve, aka IAC, and busted the clip on its electrical connector. The gasket between it and the carb fell apart. Quite brittle.
Engine runs well enough to drive but not great. Next week I plan to do the plugs wires cap and rotor. Maybe a new IAC.
Have a out of balance wheel on the left front or maybe it needs shocks. Will try rotating that tire to the back.
Seems that only the speedo, volt meter and oil pressure gauges are working. If the others are moving they are not going back to zero. I figured I would need to get into the dash again. No big deal but I think they were working when I took it apart.
Removed 2 seat covers which were hiding quilt batting, a blanket, and a pillow. Found the seat adjuster and now I have enough headroom.
This virtually rust free truck was acquired from someone we know. The odometer stopped working 10 years ago at 46K. It was used as a farm/ranch truck.
Shortly after purchase the ignition module inside the distributor burned out. First I purchased the wrong one. The next one I purchased lasted about 20 miles. The screws holding it to the distributor base plate let loose. Maybe this was why the original one died. I ordered a better than original AC Delco module and replaced the sheet metal screws holding it down with machine screws and nylock nuts.
The front end is a bit messed up but it seems to be entirely cosmetic.
The brakes are very poor. You can stop with enough advanced warning. Not safe in traffic. When you hold your foot on the brake you can hear a hiss and the engine speeds up. Thinking it is the brake booster.
When you turn the ignition on or off a troll kicks the dash about 10 time. Very annoying. Something with the air blend door I think.
There is another dent above the drivers side rear wheel.
Has a bumper hitch and round trailer wiring connector.
The truck has a toggle switch for power and a starter button in the ash tray. Kind of interesting but the wife suggested we put it back to factory. I pulled the steering column apart to get the old ignition lock cylinder out. YouTube helped with that.
When I exposed the wiring I found this. I don't see where any wires have been cut but I also don't see how it goes together once I remove the added switch and button.
It is easy to insert the black connector but the blue one is problematic. I accomplished it by removing the 'starter switch' from the top of the steering column.
I managed to get the truck started using the modified old lock cylinder but was unsure if the bits past the lock were not damaged.
Wednesday, February 8, 2017
The parts in the above image are wrong , they are for a tilt wheel. Need to order this one.Today I finished tearing down the steering column, The videos on youtube must all be for tilt wheels. Mine had screws from the bottom holding the upper housing to the lower. There was minor plastic damage where the last guy tried to pry it off, as did I. Removed the hi/low and ignition switches again.
The gear shown above is missing a tooth in my column. I am removing the wheel lock mechanism. It is pushed up by the key switch action and pushed back down by a spring. The spring is weak. Getting rid of it may also make the key a bit easier to run. Yes I am cleaning everything up.
Saturday, February 11, 2017
Today and yesterday I put the steering column back together. Used silicon grease on the moving plastic parts. There is a bit of a gap between the wheel and column but I can live with that.
Need to be sure that one installs the rod for the hi/low beams and the metal bit that connects the blinker lever to the blinker mechanism inside the column prior to installing the lock plate.
Used a AC Delco switch and the key comes out without the lever mechanism. So as mentioned above I did not the steering lock pin and the key release lever.
Ran it around a bit, dash cluster not installed, and had a friend verify that the booster is dead.
Saturday, February 18, 2017
The brake booster is in. Works well but will work better when I get around to bleeding the brakes. Pulled the idle air valve, aka IAC, and busted the clip on its electrical connector. The gasket between it and the carb fell apart. Quite brittle.
Engine runs well enough to drive but not great. Next week I plan to do the plugs wires cap and rotor. Maybe a new IAC.
Have a out of balance wheel on the left front or maybe it needs shocks. Will try rotating that tire to the back.
Seems that only the speedo, volt meter and oil pressure gauges are working. If the others are moving they are not going back to zero. I figured I would need to get into the dash again. No big deal but I think they were working when I took it apart.
Removed 2 seat covers which were hiding quilt batting, a blanket, and a pillow. Found the seat adjuster and now I have enough headroom.
Tuesday, December 6, 2016
Acquisition: Craftsman
Model 917.257644
Web Image
Picked it up and stored it in the truck. Starter spun but did not engage. Owner said he messed up the transmission attempting to fix a broken axcle C clip.
New tires and maybe new belts.
Got rid of dropbox need to setup something else to upload camera images
.
Got rid of dropbox need to setup something else to upload camera images
.
Monday, February 6, 2017
Moved this tractor to the south garage to work on it. Fell off the trailer but it is a low trailer. Maybe the shock did it some good. The starter worked. Put some gas in it and it started. But everything under the thing is messed up. Thinking I will have to pull the motor and tranny so I can work on it upside down.
Friday, September 9, 2016
Barn Find: 1982 Honda VF750S Sabre
Found this parked in a mostly enclosed car port, I think that qualifies as a barn find. 18,886 miles and last tagged in 2001.
No keys or title. I think I can get both of them. Had the plates checked and the bike is not hot. Things have gone bad sitting but the engine does turn over when pushed in high gear.
For more info see the Honda VF750S page.
Friday, April 29, 2016
Tractor Snatcher
Added a one way, load only, winch to this old trailer. Lowered the hitch to level the best as much as possible.
The winch mounts to 3 1/2" carriage bolts with the heads ground down. The bolts are mounted to a 3" thick wood block that mounts to the trailer hitch with the center bolt and an additional bolt on the other end.
Winch works well but I need to build a fold up tail gate/ramp. It works fine if I use the metal ramps from the car trailer.
Works fine off a car battery. Loaded one tractor using the battery from the tow lawn tractor. Still had enough charge to restart the tractor.
This trailer could be a foot long for tractors with a font bumper but even they fit with the rear wheel about 1/2 on the trailer bed. A ramp might fix that too.
Need to get a picture or better still a video of a tractor being loaded.
The winch mounts to 3 1/2" carriage bolts with the heads ground down. The bolts are mounted to a 3" thick wood block that mounts to the trailer hitch with the center bolt and an additional bolt on the other end.
Winch works well but I need to build a fold up tail gate/ramp. It works fine if I use the metal ramps from the car trailer.
Works fine off a car battery. Loaded one tractor using the battery from the tow lawn tractor. Still had enough charge to restart the tractor.
This trailer could be a foot long for tractors with a font bumper but even they fit with the rear wheel about 1/2 on the trailer bed. A ramp might fix that too.
Need to get a picture or better still a video of a tractor being loaded.
Wednesday, March 2, 2016
Rigid hone info
Found this on a sunnan site today regarding their rigid hone.
[QUOTE]Optimum RPM is calculated by dividing 1200 by
the bore diameter in inches... for example: 1200 ÷ 6 inches = 200 RPM;
or dividing 30,000 by the bore diameter in millimeters... for example
30,000 ÷ 150 millimeters = 200 RPM.
If the power source is a drill press or other rigid stroking device, make
sure your portable hone is equipped with two universal joints to provide
full floating action at the honing head.[/QUOTE]
[QUOTE]Optimum RPM is calculated by dividing 1200 by
the bore diameter in inches... for example: 1200 ÷ 6 inches = 200 RPM;
or dividing 30,000 by the bore diameter in millimeters... for example
30,000 ÷ 150 millimeters = 200 RPM.
If the power source is a drill press or other rigid stroking device, make
sure your portable hone is equipped with two universal joints to provide
full floating action at the honing head.[/QUOTE]
Subscribe to:
Posts (Atom)