Been thinking about looking for a 20 over piston cheap on ebay. There is a date split for the part number.
The split is at date code 01060600/01060700 so it needs the early part. #499292
Found a new one on ebay free shipping for $33.50
A rod is part #494504 is over $40 so one may as well buy the $100 kit if getting more than the piston.
I offered to help an acquaintance get his two John Deere tractor running. I was expecting tractors from the late 90s or newer but ended up looking at a JD111H and a JD160.
So far all I have done is attempt to air up the tires. Tractors with flat tires are had to move. One of the rears on the 160 has a tube but should have gotten a boot to go with it. The other 7 took air do not know how long they will stay up. Lot of cracking sounds when I filled them.
After filling the bags once the engine would not do more then put put. Could be a fouled plug. I have put maybe 3 hours on it. First I will try a bit of carb cleaner to see if it is not getting enough fuel. If that does not help I will check the plug to see if it is dirty.
Carb cleaner did not help. Plug was sooty but not oily. So I took of the valve cover. The exhaust valve stud had come loose from the head. Don't see how it could have run at all.
Cleaned the threads in the head and on the stud. Use blue thread locker. Torqued to 100 in/lbs. Somebody said 45 and I did not see a figure in the repair guide but 45 is hardly tight.
After torquing I put the rocker back in place and there is zero clearance so it may have already been on its way out when I set the valves.
I had been thinking the valves were more noisy than when I first set them. This would explain it.
Still need to set clearances and reinstall the valve cover.
Saturday, March 28, 2015
Done that a mowed for about a hour with it. Ran it up to coffee this AM and just as I entered the parking lot the motor revved out of control. Shut it down and it was find. Parked it. Later in the day it did not want to start. Hope the valves are not out of whack again.
Nearly finished the dismantling today. I don't think I will ever put this tractor back together. Thinking about using the hydro from it on the LT1000 if it will fit.
But there may come a time when I get another tractor that could make use of its parts so I tried to leave the major assemblies together. Need to figure out where to store it. Took some pictures to help figure out how the wiring was routed.
The blades installed were bent. A plate used to stiffen the front edge of the deck and route the cuttings was also bent. Borrowed blades and plate from the YTS. The blades are not high lift so I will have to get proper ones for use with the bagger.
This deck is rusting but not so far gone that it can not be saved. Need to do the reverse electrolysis thing. But for now it needs to go into service.
The pulleys look like new on this deck. Both spindles are good but one is better than the other.
This is about the fanciest craftsmen deck I have seen. It has the front roller and easily adjusted anti scallop wheels front and back. Sort of goes along with having the electric clutch to drive it.
Wednesday, March 25, 2015
Someone had bend back the belt keepers on the mower to install a belt. So I took off the pulleys and straightened them. The hanger for the left side front deck link was bent. Used a sledgehammer to straighten it.
A belt tensioner spring runs between a bracket on the rear of the deck to the long bolt on the tensioner pulley. Took me a bit to figure out where it went but that seems to be the only place that makes sense.
Found that bagger could use a new gasket to seal the pipe to the bagger cover and a little rubber strap that holds the two pipes together. The mower is too close to the ground even in the up position. Putting the 20" tires back on will get me another inch but could use more. The deck could come up maybe a inch or so further but the slop in the lever mechanism eats that up.
Put 1/2 tank of gas in it and went mowing. The deck and bagger seem to be working well with just the standard blades.
Should have put in a dribble. After two laps in the drainage ditch the engine would not do more the put put put. More on that in an engine post.
Thursday, June 8, 2017
Since the above I have replaced the blades and a spindle that I ruined.
The spring fell off again today. I pulled the deck and noticed that the bolt is cross drilled to take a cotter or spring key and washer. This should keep the spring in place.
While I was taking bits of the YTS3000 I had these to out to accept the parts.
You can see the grey YTS wheels on the rear of the DYT. The original tires are 20s and the 18s look small but they are the same as the LT100s.
The DYT is trying the YTS bagger on. I have been in need of a decent sized bagging machine to collect leaves for composting. This may be it but the motor smokes so I should put together the first 31P777 as it is like new. Need to see what oil consumption is and try it with 30W as it may have multiweight in it. Maybe new rings would do it but it would be easier to put the #1 engine back together.
Thanks to to bits from the YTS the DYT now has working lights. I think the lights were the last thing not working. I am starting to take a shine to this tractor.
A bit of a parts missing turkey. This one was close to home so I took the 682 and the wagon to haul a front wheel borrowed from the LT1000 and an air tank to the tractor. Used the 682 to to tow the tractor to where I could load it. The plan was to use the 682 to tow it onto the trailer but it was easy enough to push it on as I had the trailer parked in a dip.
This is by far the newest tractor I have acquired.
According to the net it looks to be a 2009 with a 21HP single cylinder briggs.
The hydro release lever has been replaced with a wire and the tractor rolls freely. Not sure what is going on there. Will have to pull the seat pan to find out.
At least in the short term this tractor will act as a donner. The rear tires will go to the DYT4000 until its new ones are purchased. As will the headlight wiring harness and sockets. Maybe the mower discharge chute.
Other than the engine it is also missing the gas cap, a front wheel, and maybe some of the front mower linkage.
Started a non destructive part-out. The rear wheels and headlight harness went to lurch the DTY4000. It was missing one front wheel so it only has the 1 front left.
Pulled the deck. The deck engagement is cable operated. Don't like that. The deflector is beat up on the ends but has a good hinge. Lurch has a better deck. Also noticed that lurch has smaller pulleys on the deck spindles. Wonder if they run faster or if the YST also had a smaller PTO drive pulley. Spindles might be the same.
The grass bins are a correct fit for lurch. If the pipe from the deck to the bins work it will be great.
The floor pan is sandwiched between the frame and the pedestal. The top half of the pedestal is plastic.
Tomorrow I plan to pull the tractor down to the frame. Maybe it can be used for a 4 wheel wagon. Want to see if the hydro would work as a spare for lurch.
The tractor is also missing the engine PTO pulleys but I think the one that came with the first 31P777 should work. That is if I ever collect enough parts to put it back together.
The LT1000 needed its wheel back so I put this tractor into storage while it waits for new tires. The deck needs some work. One of the blades is bent down. Could be they loaded it with a fork lift. That would explain the 4" slit in one of the back tires. The deck lift mechanism is a bit on the sloppy side. If it was tighter it might lift another inch or two. It can use all the lift it can get.
--------------------------------------------------
Mower deck belt guards
Ammeter
X 08.56 prime Air filter 6971507
X 07.59 Oil filter carquest 8534 X 47.99Hi-Run WD1138 ReplacementTire, 20X10.00-84PR110130999 TSC ship to store
When assembling the valves I used vaseline between the pushrods and rockers. bad idea because when the vaseline left they were too loose. Readjusted them.
Installed the gas tank and fender pan.
It works well with just a bit of smoke when throttling up after idling.
A few bolts still need to be reinstalled and some bits are missing but it is working. Need a rear tire.
Battery charges, hour meter and lights do not.
Saturday, March 21, 2015
Hour meter works just was unhooked. Read 1402 not 402. The tractor does not have that many hours on it. Must have been left with the key on. Good chance of that with a broken ignition switch.
New ignition switch works.
Found that the air baffle in the hood was missing a screw and in lop sided. The hole for the missing screw was stripped. I put sheet metal screws in the existing holes on both side. This may help with cooling. Remember this?
Shot some video of a drive. Not sure about valve noise maybe pull the cover and check again. Could be I am just too sensitive about it.
The engine needed more than a head gasket. It had a bent intake push rod and the rocker arms were worn such that the valves could not be adjusted properly. The needed parts were borrowed from the 2nd 31P777. The valve adjusters were a bit different but worked. They used a 5/8" wrench instead of of 10 mm.
The engine must have been overheated because the plastic manifold between the carb and the engine was damaged.
The other pipe was OK but the red rubber seal like the on you see on this pipe was cooked. Need to order a few of them.
The transmission will not roll or move the tractor when running. Aparently the lever on the back moves this collar (web image) which couples and decouples the rear end from the hydro motor. Need to see if I can get that collar to move.
I was thinking this lever was supposed to move but I mow think it just holds the spring. If it were a rotating shaft it would more likely have a nut instead of a bolt. This looks like it bolted solid to the case.
Not sure need to look again which is why I refrained from pounding on it yesterday.
It turns out that is a lever.
The PB Blaster and some judicial hammering has got it working again. Took a while.
Once the tractor could be rolled/moved I pushed it over to the south shop because I do not like working on engines in the wood shop. Hauled the loose bits and tools over using the 682 and the 2 wheel dump trailer.
Next I needed to get the fuel system setup. The fuel pump is mounted to the plastic engine shroud.
The plastic from the 2nd engine (the JD) was in much better shape so I used it instead of the one that came with this tractor.
I had the tank on the tractor and all the lines hooked up. Used a tarp strap to hold the hydrostatic control lever away from the rear wheel. I was able to walk beside the tractor and move it ahead and back under engine power. But I screwed things up when I tried to instal the seat pan.
You can't see it in this picture but there is an elbow in the bottom of the fuel tank to feed the gas line. The elbow is shoved into a rubber bushing in the bottom of the tank. I messed up the bushing.
Need to take care and remove the gas line from the elbow rather than the elbow from the tank. Found one on amazon for $3 with prime shipping. Should be here tuesday as well as a new ignition switch.
The seat/fender pan is held on by 4 bolts. Two go into the running boards and the two that hold the seat springs down go into the gas tank hold down strap.
I have the valves set too tight. The engine will not start warm.
After cleaning and reassembling the 5.5HP engine it still smoked. The new rings came for it today and the plan is to do a quit re-ring job. The engine should still be clean so all it should take is to open it up and replace them. No cleaning required. I do have a new pan/side cover gasket which I will use if needed.
There is a temptation to change just the oil ring because it has good compression and it would save the compression rings from having to seat. But I will change all 3 rings. The thinking is that steel rings should seat without degassing on an aluminum cylinder.
Stopped for lunch. The new oil ring is much stronger then the old one. Hope it does the trick.
I finally ID'ed the 10HP briggs. Happened to be outside running in the 11HP Kool Bore on the Murray 11/36 and had some time to kill. The sun was near setting and the angle just right to see the numbers hiding in plain sight.
Today was in the 60s so I took the opportunity to check on the condition of the engine. Turning the screen by hand showed good compression. So I hooked up the jumpers and turned it over after spraying a bit of car cleaner in the intake, the carb is off.
It fired and ran for a second or so. On the second attempt the engine would not turn over. I had not heard any clunking so I figured it could be something with the starter. Dirty ones often fail to retract the gear. So I took off the shroud and that was the case.
It was amazing how badly the fins are blocked on this engine. I am debating if I should pull the engine apart and clean it inside too. That would also give me a chance to see what shape it was in but I can generally do that with just pulling the head and checking the cylinder and valves. I think I will just do a series of oil changes.
I should get this thing to the car wash but need to put a muffler and carb on to keep the water out.
The starter came off easy enough and it turns but hard, needs cleaning. The only part I don't like about fixing starters is punching out that pin.
Sunday, March 8, 2015
Linkages
Wiring near linkages
This one has the cone washer.
Soaking the nut with PB Blaster
Took the engine off and visited the car wash. I did not get all the crud but at least it is to where I car to work with it. One of the linkage rods may have gotten lost along the way.
Used the air chisel to get the drive pulley off. The lower pulley (mower drive) was trashed when the previous owner loaded it on my trailer with a fork lift.
The flywheel did not want to come so I am soaking it in PB Blaster for a while.
Monday, March 9, 2015
After soaking a day with PB Blaster the flywheel did not come off with the air chisel so I used a large HF 3 jaw wheel puller and the 1/2 air impact wrench on setting 2.
Today I pulled the engine apart. The rod journal is out of round by .004, 1.2525 x 1.2485. Reject size is 1.2470 so it squeaked buy on that one.
The cylinder has significant scoring but the engine did show good compression cold. No way to know that it will do when it warms up without trying it. I am torn between just putting it back together and getting a pair or chrome rings for $20.
I don't know how much the scoring will effect compression it may be that the engine is good enough for making a tractor move but nothing you would want to put into service.
Tuesday, March 10, 2015
The plan is to reassemble it.
Did not remove the valves, worked around them with a wire brush and lifted them to was the crud out from around them. I have done better cleaning jobs but the insides are clean.
The head gasket form the DYT4000 came today from amazon. It is bent and even broken which is not all bad as it does not tempt me to stop with this engine.
I was tearing out my hair trying to find where I left the flywheel screen, nut and washer. Then I recalled I took some photos but the one I was thinking of was a closeup with no way to tell where it was taken. The one next to it was this which nailed it.
Still missing a few bits.
Wednesday, March 11, 2015
The last few bits came together today. Grabbed a starter off another engine. Found the ditty that holds the oil filler tube in on the ground next to the tractor.
Removed the hood. Took a wire brush after the oil and dirt caked to the engine mounting area.
The engine is bolted to the frame but nothing is hooked up. I used a stick to hold the throttle open and ran jumper cables to the starter.
On the first attempt I tried carb cleaner with no joy. I changed to a fresh spark plug and used a dribble of two cycle gas. It ran while the gas lasted. I made a short video of that. This is the first try after stripping down the engine although I say 2nd in the video.
<missing video>
If I get a chance to work on this tomorrow it will be the moment of truth. Will it run without smogging mosquitoes?
I did not tighten the flywheel to the full 65 foot lbs of torque. I do not trust the HF to go that high and the CDI does not go that high.
This carb was cleaned and used on the little MTD that I scrapped so it should still be in working order. Just need to move the choke to the back side by swapping the choke rod with the one from the original rusted carb.
The original air cleaner on this engine is a foam filter setup. I may switch it to a paper element filter from one of the other engines. Maybe the same setup used by go-putz.
If I can't get a transaxle working for this tractor the engine will go to go-putz at least till I get its 13HP rebuilt or replaced.
Thursday, March 12, 2015
Installed gas tank shutoff and filter. I opted to do this because even if I move this engine to go-putz for a while I can always use this for a test stand.
My thinking is that by putting this motor on go-putz I can more easily evaluate it. If it is good and the rest of the tractor comes together I will move it back. The plan is to run in on the tractor for a few hours to see what happens. If it is still good move it to go-putz where it can get a workout. Go-putz uses an on-engine gas tank so I will not have to take any of the fuel line bits off the murray.
It got down near freezing last night and the oil in the engine was too stiff for it to turn over. I put the battery charger on the battery and will wait an hour or two while the engine warms in the sun. It is in the mid 60s but the tractor is on the west side of the shop where there is AM shade.
Got it running for a minute but did not want to do more then that without an air cleaner. What a hassle. The go-putz style do not fit because these are 1 piece carbs.
The foam ones are all worn out #535. The oval paper filter is dirty #445 and there is a spacer gasket #872 that has died. The green part is listed as a spacer but shown as a gasket.
I am trying to clean the paper filter in the ultrasonic with tide. We used to clean paper tractor filters with a special detergent so maybe this will work.
It seems to run good. No smoke that I can see. Just 1 puff when I started it. Made a bit of a video and will post it when it uploads.
Still missing both the rods from the throttle to the governor and the governor to the carb. If I move this engine to go-putz I will be using the setup of that engine and will have some time to find replacements.
I was doing some comparison between this and the DYT4000 so it seemed a good time to record the LT1000's numbers.
Engine cooling
The 2002 LT1000 has a louvered hood with the ducting attached to the engine.
The 2004 DYT4000 has the ducting attached to the hood and draws all the air from the end facing the driver. I expect there is some space between the hood and the dash.
Neither has a screen other than the one on the engine flywheel.
Cranks too good. No compression. It had a RJ17 used in L heads and does not have enough reach to get the spark where it is needed. Purchased a new sparkle plug.
I expect a valve problem and if not that a busted rod. I have a spare head if it is a valve problem. If it is a busted rod lets hope it did not mess up the rest of the engine. The unit looks like it was well cared for most of its life so maybe the cylinder bore still has some life left in it.
Borrowed a wheel from the LT1000 but the rear end would not turn. Seem odd the both the engine and transaxle would be messed up. Maybe the transaxle was bad and the valve got stuck while sitting. Anyway it is now in the insulated but unheated shop so I can look at it in relative comfort.
Wednesday, March 4, 2015
Went over and pulled the valve cover. Came off easy. Valves are moving. Started pulling the head. Have to take off muffler and carb which will have to wait till daylight. It looks like someone has been in this engine but then it is 11 years old.
The head gasket had the typical failure. (so not a busted rod or valve problems) Path from the cylinder to the valve area.
Set the bore gage to zero on the good block and used that to measure this one. It has .005" of wear in one axis and nearly zero in the other. The 200 hour block where the owner never changed the filter is nearly uniform .005" on the top. I do not recall what it was at the bottom but I have read dirty oil should wear more on the bottom but this was dirty oil and I am thinking it did not.
But the cylinder has no scoring and the crank and cam seems to be ok. The cylinder is very oily but with that bad gasket it will suck oil into the cylinder on the intake stroke.
I am contemplating putting a used head gasket on it and see if I can get some compression. But first I want to take a look at the valves.
Found a gasket but the metal foil is mostly missing. Maybe use black RTV (which is what I have) to get a good seal just to test the conditions of the rings with a compression test..... But amazon is selling the gasket for $6 and I am not going to mess around for that. I should come in about a week. It would be nice to find that this thing could run without major work. Maybe too much to wish for.
Switching over to the rototiller 5.5HP engine assembly.
Friday, March 6, 2015
Gasket will be here on tuesday.
Saturday, March 7, 2015
Need to pull off the seat pan to get at the transaxle.
Tuesday, March 10, 2015
The head gasket came but was unusable. Amazon will have another here on Thursday. Not bad.
Thursday, March 12, 2015
There was a mixup in the replacement gasket. Not sure what happened but I am told there will be on here tomorrow.


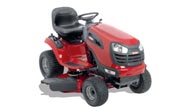 This is by far the newest tractor I have acquired.


.jpg) The transmission will not roll or move the tractor when running. Aparently the lever on the back moves this collar (web image) which couples and decouples the rear end from the hydro motor. Need to see if I can get that collar to move.
The transmission will not roll or move the tractor when running. Aparently the lever on the back moves this collar (web image) which couples and decouples the rear end from the hydro motor. Need to see if I can get that collar to move.
 It turns out that is a lever.
 Next I needed to get the fuel system setup. The fuel pump is mounted to the plastic engine shroud.
 You can't see it in this picture but there is an elbow in the bottom of the fuel tank to feed the gas line. The elbow is shoved into a rubber bushing in the bottom of the tank. I messed up the bushing.


 The engine is bolted to the frame but nothing is hooked up. I used a stick to hold the throttle open and ran jumper cables to the starter.


 The head gasket had the typical failure. (so not a busted rod or valve problems) Path from the cylinder to the valve area.


